How to change a plug is a relatively simple task that you can complete by yourself without the need of having to call in a electrician, so we have created this guide for a step by step guide on how to change a plug and how to change a plug socket. But however if you are having any issues always make sure you contact your local electrician.
Items needed to wire your plug:
- Small philips or flat headed screwdriver – depending on your plug type.
- Wire stripper / cutters or sharp knife / scissors
- A new fuse
How To Change A Plug:
1. Remove the plug cover
Loosen the screws and place them and the cover to one side. Always advisable to place in small bag like a sandwich bag so you don’t mislay them.
2. Prepare the cable
Strip about 3-4cm from the end of the thick cable coming out of your appliance using wire strippers. Do not cut too deep – you only want to remove the outer covering.
You will be left with three undamaged thinner wires. Using the cable strippers, strip about 1cm of the outer protective covering from the end of each of these wires until you’re left with bare copper wire.
Twist each end counter-clockwise to neaten the cable and stop frayed pieces from damaging your new plug or appliance.
3. Prepare the plug
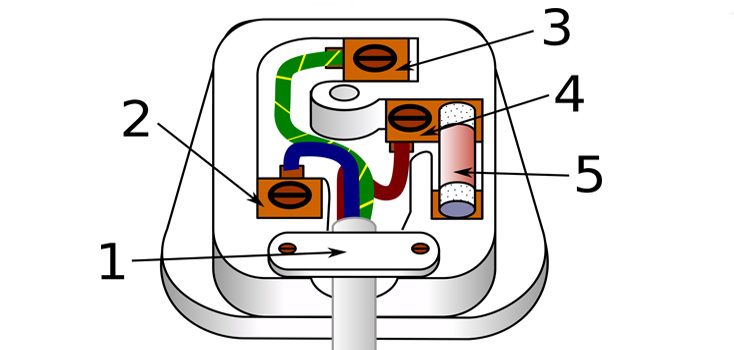
Using the numbered image below as a guide, loosen the screws of each terminal pin (2, 3 and 4) about ¾ of the way to create space for your wires to be threaded.
If present, loosen the cable grip (1) to create space for your cable to be threaded under.
4. Thread the cables
Using the numbered image above as a guide, feed the cables into the appropriate terminals.
The green/yellow wire should wire to the earth (3) terminal, the blue wire should wire to the neutral (2) terminal and the brown wire should wire to the live (4) terminal.
If a fuse is not present, place a new fuse into the fuse canal (5).
5. Ensure each cable is secure
Secure the cables in place using the terminal screws and cable grip, taking care not to over-tighten them. Ensure the cable is firmly in place by giving it a gentle tug.
At this point its important to check that no copper cable is exposed outside of the terminals — as this could lead to short curcuits later on.
6. Replace the plug cover
Once you are happy that the cable is secure, replace the top half of the plug and screw back together firmly taking care not to over-tighten.
7. Test the plug
If all has gone well you should have a working appliance. If you do not and you are confident you have followed the instructions correctly, you can try a different fuse.
If your appliance still doesn’t work after that you may need to call in the services of a qualified electrician or contact your appliance manufactuer to ensure there isn’t a fault with your appliance.
How to replace a damaged plug socket
If your plug socket has suffered any damage and is broken or is cracked then you should replace it for safety reasons. Replacing a plug socket is a fairly easy and straightforward task that you can simply complete yourself without the need of a electrician, however working with electricity can be fatal so if you have any doubts do not hesitate to contact your local electrician.
Items needed:
- Small philips or flat headed screwdriver – depending on your plug type.
- Wire stripper / cutters or sharp knife / scissors
- New plug socket
How To Change A Plug Socket:
1. Work safely
As with all electrical work, make sure you turn off the electricity supply if you dont your no all about it so be sure to first locate your circuit breaker or fuse box and turn the electricity to the OFF position at the mains.
Leave a clearly visible note on display so other members of the household do not inadvertently switch it back on while you are working.
2. Remove the broken socket
With the electricity supply now safely turned off, remove the damaged plug socket from the wall using a small screwdriver.
3. Take note of wiring
At this point it is always good to familiarise yourself with the current position of the wires and the type of socket you have.
If there are two of each wire leading into the socket it’s likely to be a ring main and wires should remain grouped as they are currently.
If you have a mobile phone with a camera, you could take a photo of the current setup for reference later on.
4. Remove the wires
Using a small screwdriver, unscrew each terminal at the back of the broken socket and remove the wires.
5. Inspect the wires for damage
If the cables look frayed or damaged, now is a good time to snip the frayed ends and create new exposed copper with your wire strippers to ensure a good connection.
6. Insert the wires into new socket
At the back of your new socket, terminals should be clearly marked – L for Live/Phase, N for Neutral/Common, and E for Earth/Ground.
Insert the live (either red, or brown) cable into the terminal marked L, screw down firmly but don’t over-tighten. Give the wire a gentle tug to ensure it is secure. Then move on to the Neutral wire inserting and securing into the N terminal. And finally, insert and secure the Earth wire into the E terminal.
7. Replace
Ensure all connections are secure by giving another tug to each cable then with a small screwdriver, screw the socket back onto the wall box.
8. Turn electricity back on
With the socket replaced, turn the electricity back on at your fusebox or circuit breaker and test your new socket.
9. If it doesn’t work
If the new socket does not fix your problem, please do not hesitate to contact your local electrician for professional help.
Please note that working with electricity can be fatal. If you do not feel confident or competent in completing your task please contact your local electrician